ASP.NET Web API with WebForms
ASP.NET Web API is an ideal platform for building RESTful applications on the .NET Framework, However for some reason there are no samples or documentation (as of this writing) of using the new Web API framework with ASP.NET WebForms. So I thought I’d write a brief post on how to do this.
In order to get started, you’ll need to install, at minimum the AspNetWebApi package from the NuGet Gallery. Instructions for installing the package using the Package Manager Console are provided in that page as well.
If I were you, I’d install two other package that you’ll need eventually. The Core package should get installed automatically when you install the AspNetWebApi package.
AspNetWebApi.Core -This package contains the core runtime assemblies for ASP.NET Web API. This package is used by hosts of the ASP.NET Web API runtime.
AspNetWebApi.SelfHost - This package contains everything you need to host ASP.NET Web API within your own process (outside of IIS). ASP.NET Web API is a framework that makes it easy to build HTTP services that reach a broad range of clients, including browsers and mobile devices.
After working your way through this post, if you’re ready for the slightly more complete (production ready) RESTful Web API service, check out this post: ASP.NET Web API Supporting RESTful CRUD Operations. If you’d like to build a RESTful client application, be sure to check out this post: A Generic RESTFul CRUD HttpClient
First ASP.NET WebForms Web API Project
You can do this using VS.NET 2010 or VS.NET 11 Beta (at this time). The process is identical after you’ve installed the perquisites mentioned above.
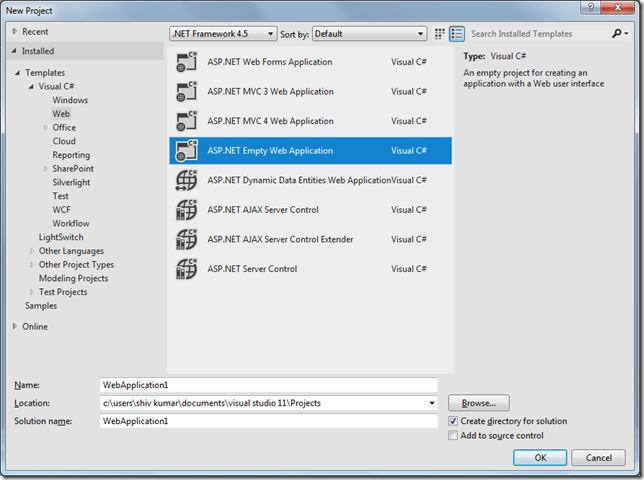
Start with a brand new ASP.NET Empty Website project
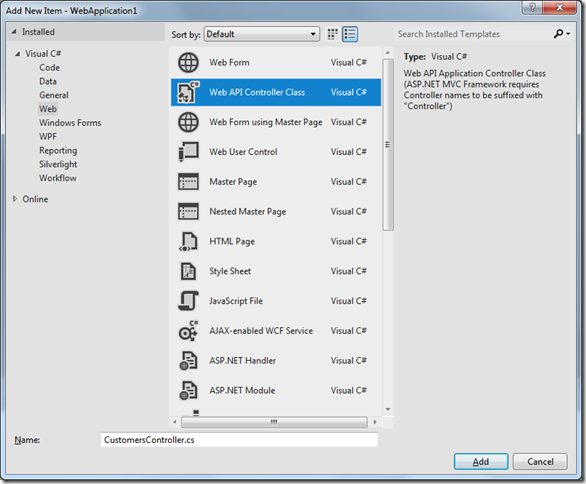
Next, add a Web API Controller to your project.
And name the class CustomersController.cs.
The name of the class is important here, because of the way we’ll set up our routing, and the conventions involved.
If you’re building a Web Site project instead of a Web Application project, you’ll need to add the app_code folder to your project and then add the Web API Controller in this folder.
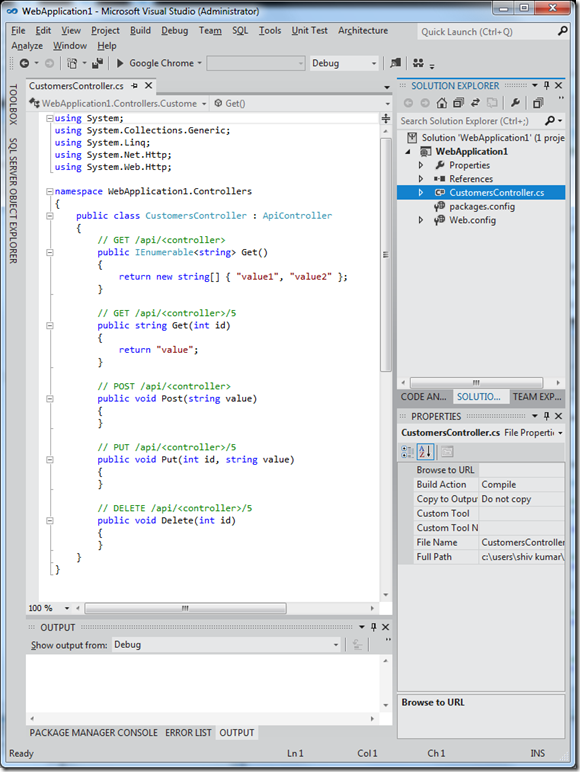
Your controller class should look like this:
Notice that the controller descends from ApiController. This is the base class for all WebAPI controllers because the built-in HttpControllerRouteHandler expects this. If you’re familiar with RouteHandlers, you can very easily plug into the pipeline and change all of this. In this post, we’ll keep it really simple and change nothing.
Adding the correct Route to the RouteTable
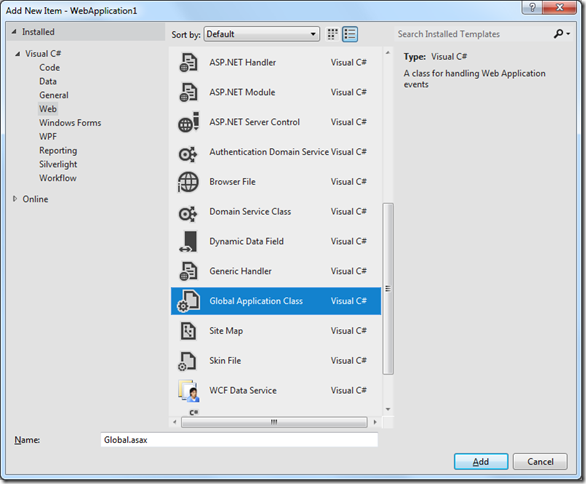
You’ll need to add Global Application Class, to your project. So add a new item to your project and select Global Application Class as shown below. Don’t rename it!
Open the Global.asax.cs file by first expanding the Global.asax node in Solution Explorer and then double clicking on the Global.asa.cs node.
To the using section at the very top of the file, you’ll need to add, two namespaces:
System.Web.Routing, and System.Web.Http as shown in the code listing below
using System;
using System.Collections.Generic;
using System.Linq;
using System.Web;
using System.Web.Routing;
using System.Web.Http;
using System.Web.Security;
using System.Web.SessionState;

namespace WebApplication1
{
    public class Global : System.Web.HttpApplication
    {

        protected void Application_Start(object sender, EventArgs e)
        {
            RouteTable.Routes.MapHttpRoute(
                name: "CustomersApi",
                routeTemplate: "api/{controller}/{id}",
                defaults: new { id = RouteParameter.Optional }
            );
        }

        protected void Session_Start(object sender, EventArgs e)
        {

        }

        protected void Application_BeginRequest(object sender, EventArgs e)
        {

        }

        protected void Application_AuthenticateRequest(object sender, EventArgs e)
        {

        }

        protected void Application_Error(object sender, EventArgs e)
        {

        }

        protected void Session_End(object sender, EventArgs e)
        {

        }

        protected void Application_End(object sender, EventArgs e)
        {

        }
    }
}
The Global Application Class file
That’s it! You’ve built your first Web API application with ASP.NET WebForms.
In order to test your application, simply run it and then navigate to to the following url
api/customers/
That is, simply add the above to the url you see in your browser. You’ll see an error page when you run your application, because there is no default page in your application, so don’t worry about the error page. Simply navigate to the url above and you’ll see your result.
If you’re using IE, the response will be sent as JSON, but since IE does not show JSON directly in the browser window, you’ll need to “open” the file and open it in Notepad in order to see the response. In Chrome, you’ll see the response as Xml.
As I mentioned earlier in this post, for a more complete implementation of a RESTFul service and a corresponding RESTful client, check out these two posts:


